About Online Communication Protocol
OCP is an online platform for communication between an experimenter and participants in an online experiment. OCP is not a complete experimental environment. It can be used to control communication, but calculations, advanced visual and sound transmission need to be implemented elsewhere. The idea is that OCP will be used only for sending short messages and decisions, but calculations and data processing will be done in Excel (or another spreadsheet), while voice and image communication such as instruction sharing will be done by Zoom (or another commercial video communication tool). OCP was developed because of limitations in the chat possibilities of existing commercial communication platforms.
This is a quick introduction to using the OCP for running an experiment. OCP consists of a database of decisions and messages running on a server, an experimenter interface running through a browser, and a participant interface also running through a browser.
Participant interface
A participant connects to an experiment via OCP through a link sent to them by the experimenter (see experimenter interface below). Pressing this link opens the participant interface:
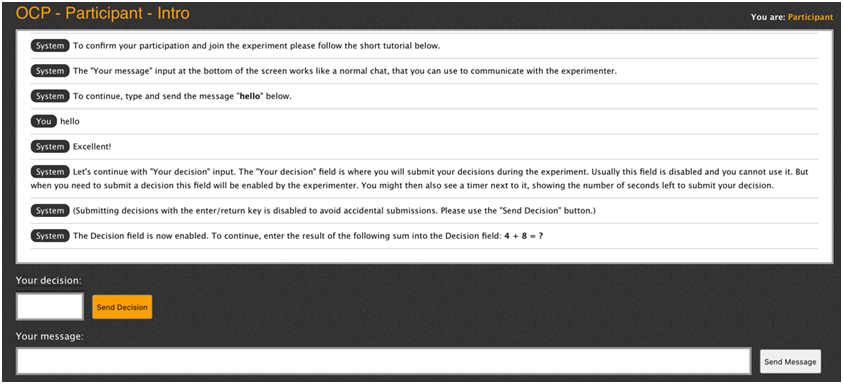
The participant starts with an introduction where she needs to type a message and send a Decision, to familiarize herself with the interface. This also prevents participants erroneously opening several instances of the interface on their computer. They can still do so, but need to open them in different browsers and go through the introduction every time.
The participant will connect to OCP only after she completes this introduction. Her interface will clean up and she can start interacting with the experimenter:
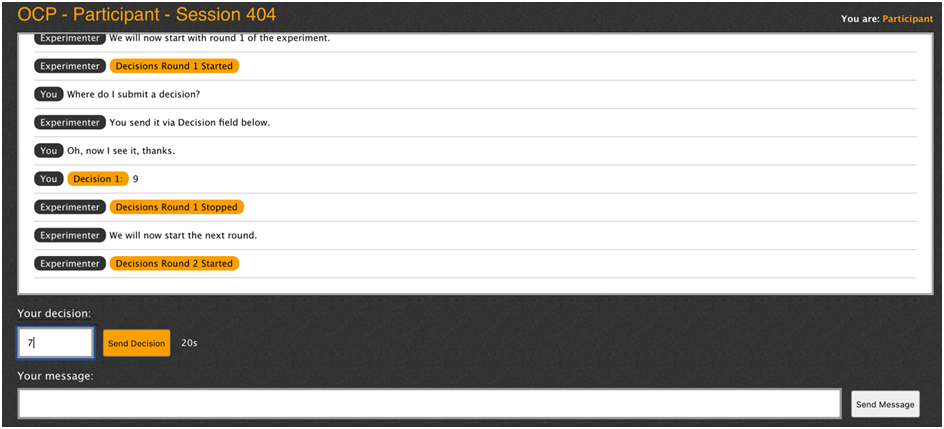
On top the interface shows the session number - this should be the same number that the experimenter sees on their screen. Below they see a list of all their decisions and communication with the experimenter, including all experimenter public announcements and decision rounds. Below this list there are two entry boxes: the decision box "Your decision" and the message box "Your message".
Decisions
A participant can submit a decision when the "Send decision" button is active - this is when the experimenter opens the decision boxes for all participants (see experimenter interface below). The "Send Decision" button is then painted orange to signal to the participant that she must submit a decision.If the experimenter sets a timer, the countdown is shown next to the decision button. Note that the decision box does not close until the experimenter closes all decisions in its interface. This means that
- decisions will stay open after the timer reaches 0 if the experimenter does not close them,
- a participant can change her decision as many times as she likes while decision box is open,
- only her final decision before closure will be recorded,
- the experimenter must close decisions in order to permanently record them and move to the next round. The decision button is then painted grey, and decision submissions are not possible.
A participant can send a message (up to 240 characters) to the experimenter at any time. Messages cannot be sent from one participant to another participant - all messages go through the experimenter (but the experimenter can copy and resend a message from one participant to another).
Experimenter interface
The experimenter starts a new OCP session by entering chat.tig.si into a web browser. This opens a new session with a unique session number, a unique participant link and a unique administrator link:
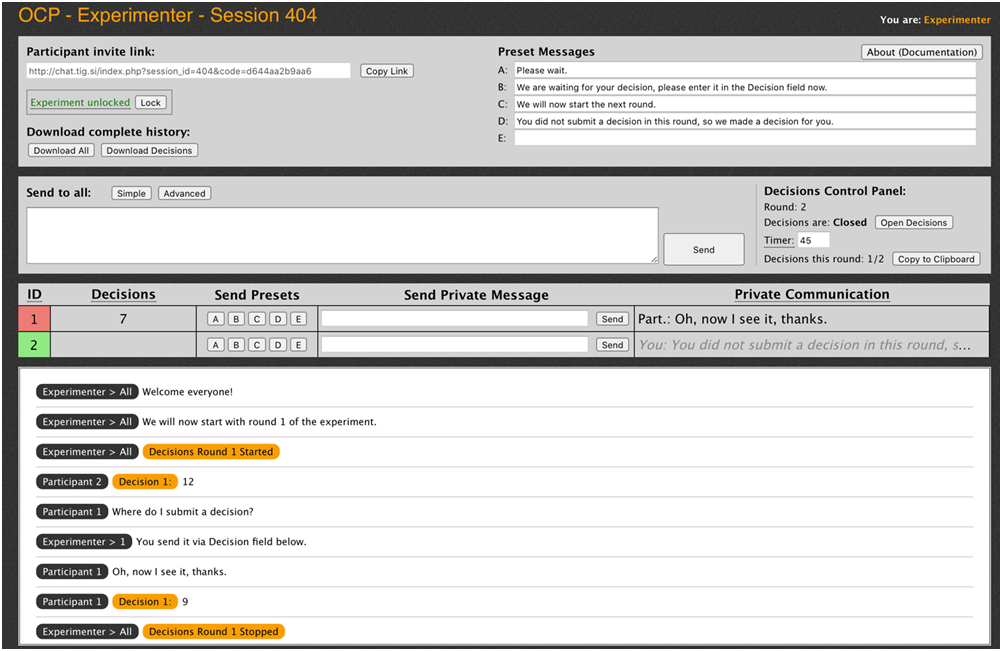
On the top the interface shows the session number - this should be the same number that the participants see on their screens.
Inviting Participants
Below there is the participant invite link. The address should be shared with participants, who can use it to open the participant interfaces in their browsers. You can copy this address into clipboard by pressing on the "Copy link" button and then paste it into Zoom chat for example.
The web address of this experimenter interface will always serve as a link to this session during and after the experiment. It should be immediately saved/bookmarked (in case of problems where the experimenter loses connection) and can be shared with the other experimenters (for security or if they need access to the events in OCP during the experiment).
Locking the Session
Below is the "Lock/Unlock" button which can be used to restrict access to the OCP. If you lock the session, new participants cannot join this session, while existing participants are able to continue. This is a security feature in case you already have a sufficient number of participants in OCP or want to avoid spamming. Participants that want to enter a locked session will see the following message instead:

You can unlock the session to new participants again at any time during the experiment, if you decide to allow entry to new participants.
- Note that you cannot remove participants from the session, but you can indicate which are spamming or inactive with a color (see below).
- If a participant loses connection during the experiment they will be able to rejoin later from the same browser even if experiment is locked.
- If a participant starts using a new computer or a new browser during the experiment, she will appear as a new participant in addition to her old connection. It is not a good idea to allow this, as it will mess with the calculations, group structures, etc.
Downloads
Below are two buttons where you can download the complete history from the start of the experiment: "Download Decisions", "Download Messages & Decisions" that can be used at the end of (or during) the experiment to save communication and decisions into files. The first saves only a list of all decisions, and the second saves all messages and decisions, up to that point, for all participants, into .csv files which can be imported into excel (deliminated by the colon sign ";" ).
- Decisions will appear in excel in the following format: each participant in its own column, and each decision in its own row.
- History will appear chronologically, again ordered by participants in columns. History will be useful if you want to use messages in your analysis, for example if some decisions are submitted through messages that are longer (240 char limit) than decisions (20 char limit), or if you want to analyze/control communication between participants.
- Make sure you save both the history and decisions to your computer at the end of every experimental session, for backup.
Various
To the right there are five boxes where you can enter or change preset messages at any time during your session. We will discuss them later below. Above is the button About (Documentation) that opens these instructions in a new browser window.
Messaging
The next window below contains a public message box and the decision round controls.
In the public message box you can type a message that will be sent to all participants. It has two options, Simple and Advanced:
- In the Simple version the same message will be sent to all participants.
- In the Advanced version different messages can be sent to different participants. (see below)
Advanced sending of messages
By pressing button "Advanced" the message box format changes:

It consists of three fields: Prefix text, Participant lines, Suffix text. Prefix and suffix are the same for all participants. In Participant lines you can send a different value or text to different participants. Each line contains the value/text for one participant and they are ordered by participant experimental ID, like you see them in the participant list below.
- A participant will receive the message: Prefix text + her Participant line + Suffix text
- If Participant line is empty in row x, that participant (ID x) will not receive any message. This can be used to send messages to only some participants.
- Participant lines can be pasted from clipboard. For example: earnings are calculated in excel, listed in a column, then copy-pasted into Participant lines.
Decisions Control Panel
In the "Decisions Control Panel" you can see the current decision Round, buttons to open or close decisions, a Timer field, the number of participants who have submitted a decision this round, and a button to copy decisions to clipboard.
- Round index increases by one every time you press "Open decisions" button: it counts how many times you have asked participants to enter a decision. This is not necessarily the number of rounds in your experiment (for instance if there are several decisions per round).
- Decisions on the participant interfaces are closed until the experimenter presses the button "Open Decisions". The decision boxes will then open for all the participants (and previous Decisions will be cleared in the participant list below). The timer, if set, will start immediately. The decision boxes will stay open until the experimenter presses the button "Close Decisions".
- Timer can be left empty or given an integer number. If empty then no countdown is shown here or on participant interfaces. If a number is entered, then a countdown will be shown for the entered number of seconds on both the experimenter and the participant interfaces. Nothing will happen at the end of the countdown, but you can for instance then close down the decisions manually.
- Once decisions have been submitted and "Close Decisions" button was pressed, they can be immediately copied into excel (or another spreadsheet). You first copy them into the clipboard by pressing "Copy to Clipboard" and then past them into Excel. You select a top cell of a new empty column in an Excel sheet and the decisions will be copied into this column, one decision per row. The decision of the same participant will always be in the same row, so you can keep a list of all decisions for any participant in her separate row. This can be useful for instance if you want to use Excel to compute the average decision or payoffs in every round, which you can then report back to the participants via Advanced messages. You can also use this to quickly compute the final payoffs in the experiment.
- In case you make a mistake or forget to copy decisions during the experiment, you can download a table of all decisions into a file from the history download.
Participants Table
Below you have a list of all participants, one participant per row. For each participant you see her ID (which you can color), the current decision, send her a preset or tailored private message, and see the private communication with her.
- The participants are ordered with ID as they join the session in OCP. You can change the color of the ID square by clicking on the ID number. There are five colors you can use. Assigning colors can be useful if
- you want to remember which participants have made some decisions in the past: you click on the ID the moment this participant first makes the decision you need to remember. You can later remove this color if you like.
- you want to assign roles: For instance if you will divide participants into sellers and buyers (leaders and followers, A and B, etc) you can color sellers before the experiment starts, for simple identification during the experiment. You can also assign three or more roles using three or more colors.
- you want to assign groups. You can color participants in each group with the same color. For instance, if you have groups of 3, then you can color the first three participants in green, the second groups of 3 in no color, the next group in a green color again. Or you use a different color for every group (blue group, green group, etc).
- You want to indicate inactive participants.
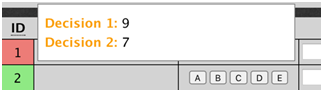
- In the column "Decision" you will see the last decision each participant submitted via their decision field. When you press "Open Decisions" this column becomes empty, and you will see participants' decisions as they are made. You will still see their decisions in this column when you press "Close Decisions" and "Copy Decisions". By clicking on a decision field for a participant you can review the list of all final decisions this participant has submitted until now. The last decision is at the bottom, but you can scroll up to see the whole history. To close it you click anywhere in this window.
- Preset messages. For each participant you see five buttons A B C D E. When you press any of these buttons you send the corresponding preset private message to this participant. You can choose five different preset messages and assign them to these five buttons in the top window of the experimenter interface. They are the same for all participants, but you can change them at any time during the experiment. If two experimenters view the same experimenter interface (using the same administrator link), they can use different preset messages. We advise, however, that only one experimenter sends messages in order to avoid mistakes and confusion. Preset messages can be used to streamline feedback during the experiment, such as warnings, role assignment, etc. The preset message is sent immediately when you press a button - you do not need to press "Send".
- You can also send a unique private message to a participant by typing it into the "Private Message Input" box and sending it with the enter/return key, or by pressing the "Send" button. This is useful if you receive a question or an unusual message from a participant, or if you need to give feedback about control questions, such as additional explanations.
- Next you see the last private message sent to or received from this participant. You can expand and view the complete communication with this participant by clicking on this field. A window then opens showing all sent or received messages with this participant. The last message is at the bottom, but you can scroll up to see the whole history. To close it you click anywhere in this window.

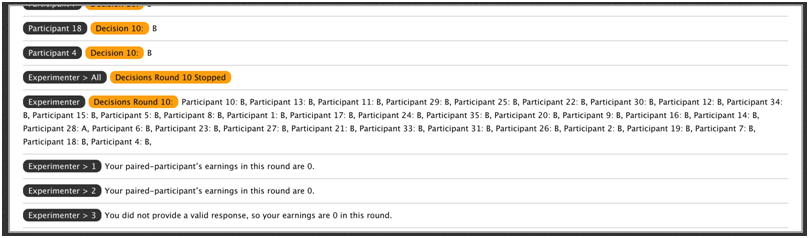
Experiment Log
Finally, at the bottom of the experimenter interface you have a chronological list of all messages and decisions that were sent in this session. You can scroll up to revisit earlier message communication or decisions. Messages indicate who sent them and to whom. Decisions are indicated with orange color and the participant ID. When you close the decisions, a list of all decisions is shown there, in case you need to go back and review some past decisions.
Note: inactive participants
Participants may become inactive for several reasons:
- They lose interest in the experiment,
- They lose internet connection,
- They run into computer problems.
A participant may become unresponsive in the middle of your experiment and you need to have a plan how to deal with their missing decisions and still continue your experiment.